Step-by-Step Guide on Covering an IV in the Shower
Welcome to 2G Medical! We are the designers and developers of a product line of HydroSeal shower protection barriers. We provide several moisture barrier products that protect customers’ vascular access sites, surgical incisions, and dressings against waterborne bacteria during showering or sponge bathing. This includes PICC Lines, Chemo Ports, Surgical Sites, Stomas, Dialysis, Hickman Catheters and many other applications. For this post, we want to focus on a step-by-step guide on covering an IV port using our products.
There are two products in particular that we would recommend for an IV cover. The original HydroSeal and our latest product, the HydroSeal Flex:
Original Step by Step Guide on Covering an IV Port
Step 1
- Wash your hands.
- Prepare the site according to your facility protocol.
- Shaving hair on selected site is NOT recommended.
- Use of lotions or creams on skin may inhibit the adhesion of the HydroSeal Flex/HydroSeal adhesive to the skin.
Step 2
- HydroSeal Flex/ HydroSeal should be applied to clean and dry skin around the sterile dressing covering the port. The sterile dressing should be completely intact before application of the HydroSeal Flex/ HydroSeal.
Step 3
- Select the appropriate size HydroSeal Flex/ HydroSeal. The adhesive edges should be applied to the patients skin and should not be applied to the sterile dressing.
- Remove one sheet of HydroSeal Flex or HydroSeal from pouch.
Step 4
- Remove top paper liner from adhesive border on HydroSeal Flex or HydroSeal and adhere to the skin approximately 1 inch above the top of the intact sterile port dressing protecting the port. Run your fingers back and forth across the adhesive strip border to assure there is good adhesive contact and seal to the skin.
Step 5
- Remove bottom paper liner from adhesive border on HydroSeal Flex or HydroSeal and adhere to the skin approximately 1 inch below the bottom of the sterile port dressing protecting the port. Run your fingers back and forth across the adhesive strip border to assure there is good adhesive contact and seal to the skin.
Step 6
- Remove paper liner with “Performance Enhanced Tabs” on HydroSeal Flex or HydroSeal and adhere to the skin approximately 1 inch to the side of the sterile port dressing protecting the port. Run your fingers back and forth across the adhesive strip border to assure there is good adhesive contact and seal to the skin.
Step 7
- Repeat step 6 on last paper liner with “Performance Enhanced Tabs” on HydroSeal Flex or HydroSeal.
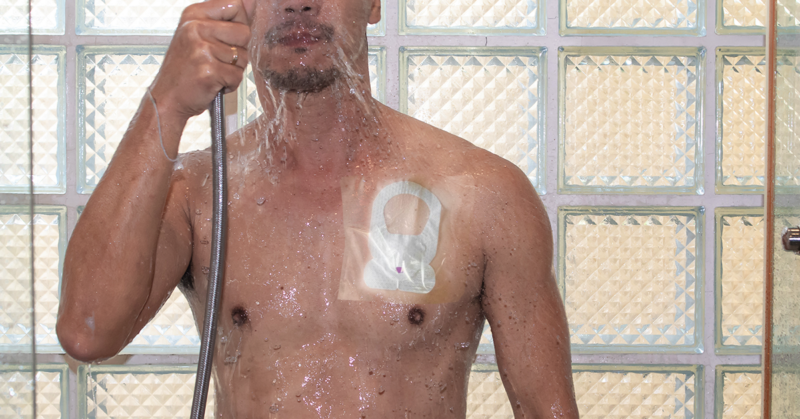
Step 8
- Shower. When finished showering – gently towel dry off the HydroSeal Flex / HydroSeal cover completely prior to removal.
Step 9
- Using a gentle removal technique slowly pull the HydroSeal Flex / HydroSeal barrier cover off starting at a corner and slowly lifting adhesive from skin. Discard as it is single use only.
NOTE:
HYDROSEAL FLEX and HYDROSEAL ORIGINAL PRODUCTS ARE DESIGNED TO COVER A STERILE PORT DRESSING WHILE SHOWERING. THE HYDROSEAL PRODUCT IS REMOVED AFTER COMPLETING THE SHOWER – LEAVING THE STERILE PORT DRESSING OVER THE PORT DRY AND INTACT. THIS IS NOT A STERILE PRODUCT SO PLEASE DO NOT REMOVE STERILE DRESSING OVER PORT AS IT MUST REMAIN DRY AND INTACT.